实验十. 基于IIC总线的EEPROM读写实验
实验目的
实验环境
- 硬件:CBT-EMB-MIP 实验平台,PC机,mini USB数据线;
- 软件: Android Studio 2.2 或更高版本, Android Plugin for Gradle 版本 2.2.0 或更高版本,CMake;
实验内容
实验原理
从第四章.《实验二. 基于IIC总线的EEPROM驱动移植实验》章节中可了解到系统启动后会在目录/sys/devices/platform/s3c2440-i2c.0/i2c-0/0-0050/下生成eeprom的一个普通文件。
因此,可以通过在JNI层编写I/O操作的相关代码即可完成对EEPROM的读写。
实验步骤
JNI中间层编程范例
#include <jni.h>
#include <fcntl.h>
#include<unistd.h>
#include<sys/ioctl.h>
#include<stdlib.h>
#include<fcntl.h>
#include "android/log.h"

static const char *TAG = "libs";
#define LOGI(fmt, args...) __android_log_print(ANDROID_LOG_INFO,  TAG, fmt, ##args)
#define LOGD(fmt, args...) __android_log_print(ANDROID_LOG_DEBUG, TAG, fmt, ##args)
#define LOGE(fmt, args...) __android_log_print(ANDROID_LOG_ERROR, TAG, fmt, ##args)

#define DEVICE_NAME    "/sys/devices/platform/s3c2440-i2c.0/i2c-0/0-0050/eeprom"
int fd;
#define LEN 256
char read_data[LEN];
char write_data[LEN];
char offset[LEN];

JNIEXPORT jint JNICALL
Java_cbt_edu_iot_eeprom_MainActivity_eeprom_1Init(JNIEnv *env, jclass type) {

    fd = open(DEVICE_NAME, O_RDWR);//打开设备
    if (fd == -1) {
        LOGI("open device %s error \n", DEVICE_NAME);
        lseek64(fd, 0, SEEK_SET);//调整偏移量,从开始位置读写
        return 0;
    }
    else {
        LOGI("open device %s ok! \n", DEVICE_NAME);
        return 1;
    }
}

JNIEXPORT jint JNICALL
Java_cbt_edu_iot_eeprom_MainActivity_eeprom_1Close(JNIEnv *env, jclass type) {

    if (fd >= 0) {
        close(fd);
        fd = -1;
    }
}

JNIEXPORT jint JNICALL
Java_cbt_edu_iot_eeprom_MainActivity_eeprom_1readByteFromI2C(JNIEnv *env, jclass type, jint pos,
                                                             jint wait_m) {
    lseek64(fd, 0, SEEK_SET);//重新设置偏移量从起始位置读取
    int ret, i;
    ret = read(fd, offset, 256);
    if (ret < 0) {
        LOGE("read failed. \n", "");
        return -1;
    }
    strncpy(read_data, offset, sizeof(offset));
    usleep(wait_m * 1000);
    return read_data[pos];
}

JNIEXPORT jint JNICALL
Java_cbt_edu_iot_eeprom_MainActivity_eeprom_1writeByteToI2C(JNIEnv *env, jclass type, jint pos,
                                                            jbyte byteData, jint wait_m) {
    int ret;
    write_data[pos] = byteData;
    lseek64(fd, 0, SEEK_SET);//调整偏移量,从开始位置写入
    if (byteData != 0) {
        ret = write(fd, write_data, pos + 1);
        lseek(fd, pos + 1, SEEK_CUR);
    }

    if (ret < 0) {
        LOGE("Write error\n", "");
        return -1;
    }//将指定数据写入当前EEPROM中
    usleep(wait_m * 1000);
    return ret;
}

JNIEXPORT jint JNICALL
Java_cbt_edu_iot_eeprom_MainActivity_eeprom_1erase(JNIEnv *env, jclass type) {
    int ret;

    lseek64(fd, 0, SEEK_SET);
    memset(write_data, 0, sizeof(write_data));
    ret = write(fd, write_data, sizeof(write_data));
    if (ret < 0) {
        LOGE("Erase error\n", "");
        return -1;
    }
    lseek64(fd, 0, SEEK_SET);
    return ret;


}

JNIEXPORT jint JNICALL
Java_cbt_edu_iot_eeprom_MainActivity_eeprom_1write(JNIEnv *env, jclass type, jbyteArray writeBytes_,
                                                   jint len) {
    //获取数组指针和长度
    jbyte *writeBytes = (*env)->GetByteArrayElements(env, writeBytes_, NULL);
    // 释放内存
    (*env)->ReleaseByteArrayElements(env, writeBytes_, writeBytes, 0);
    int ret;
    lseek64(fd, 0, SEEK_SET);
    ret = write(fd, writeBytes, len);
    usleep(10 * 1000);
    lseek64(fd, 0, SEEK_SET);

    if (ret < 0) {
        LOGE("Write error\n", "");
        return -1;
    }//将指定数据写入当前EEPROM中

    return ret;
}
导入工程源码
- 打开Android Studio,从菜单栏选择 File > Open。
- 弹窗中浏览选择光盘src目录下的Gradle工程 CH04_NDK ,点击OK导入。
- 等待工程构建完成后,在工具栏中的Android App列表中选择本实验例程CH04_10_EEPROM。
演示运行
- 平台主板通过miniUSB线连接电脑后,点击 Run
 运行程序。
运行程序。 - 点击界面中的
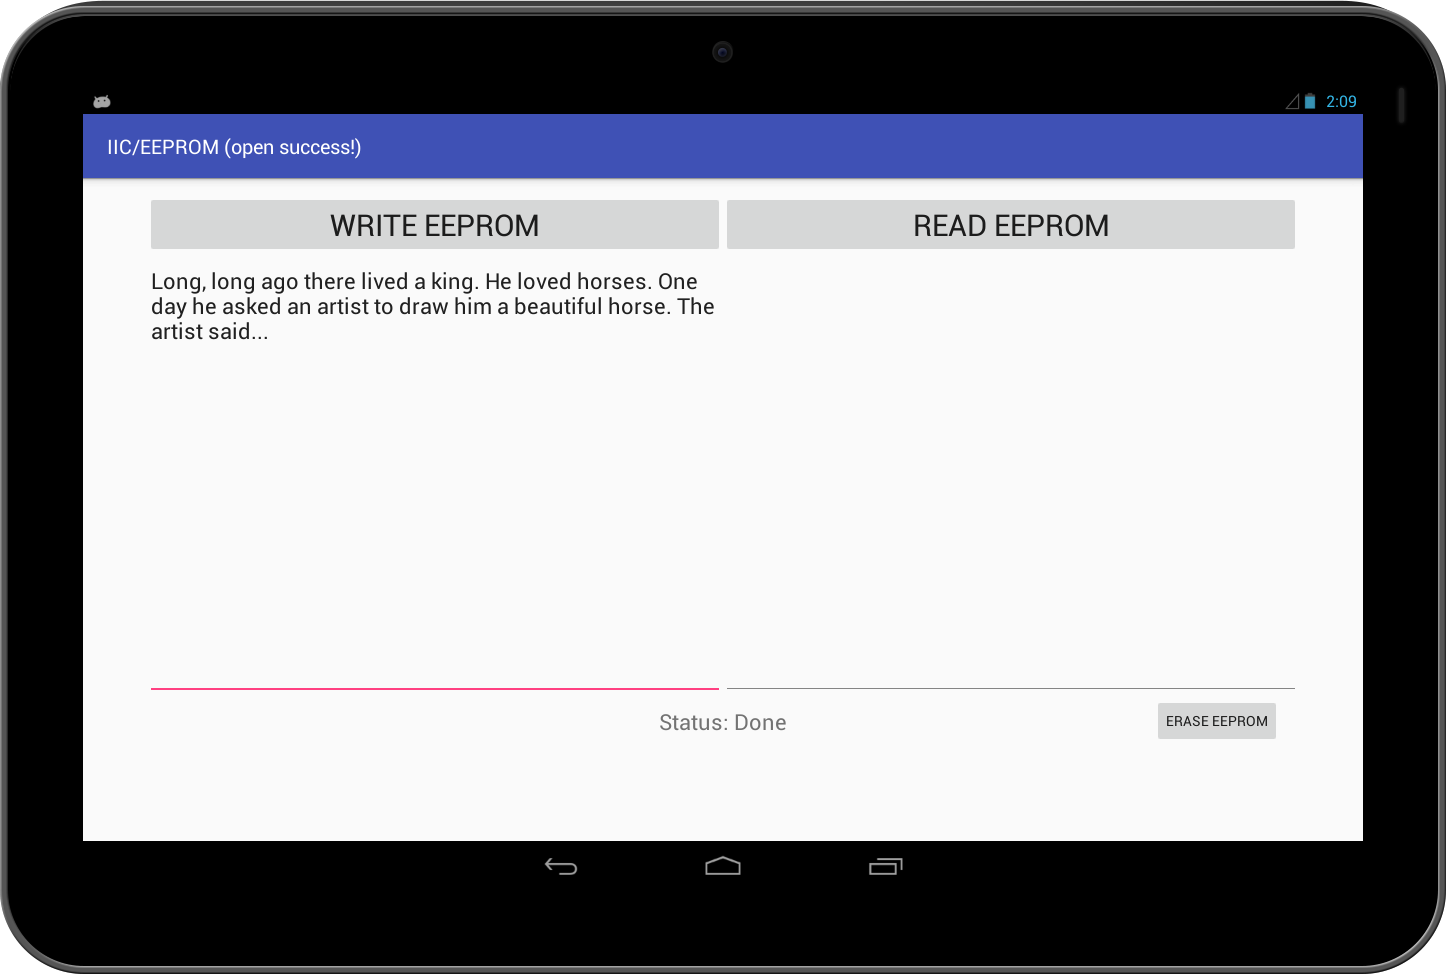
WRITE EEPROM按钮,将下方的文本写入EEPROM中,下方Status会显示当前操作的返回结果,如图5.3.1所示:

图5.3.1 主界面
- 点击右侧的
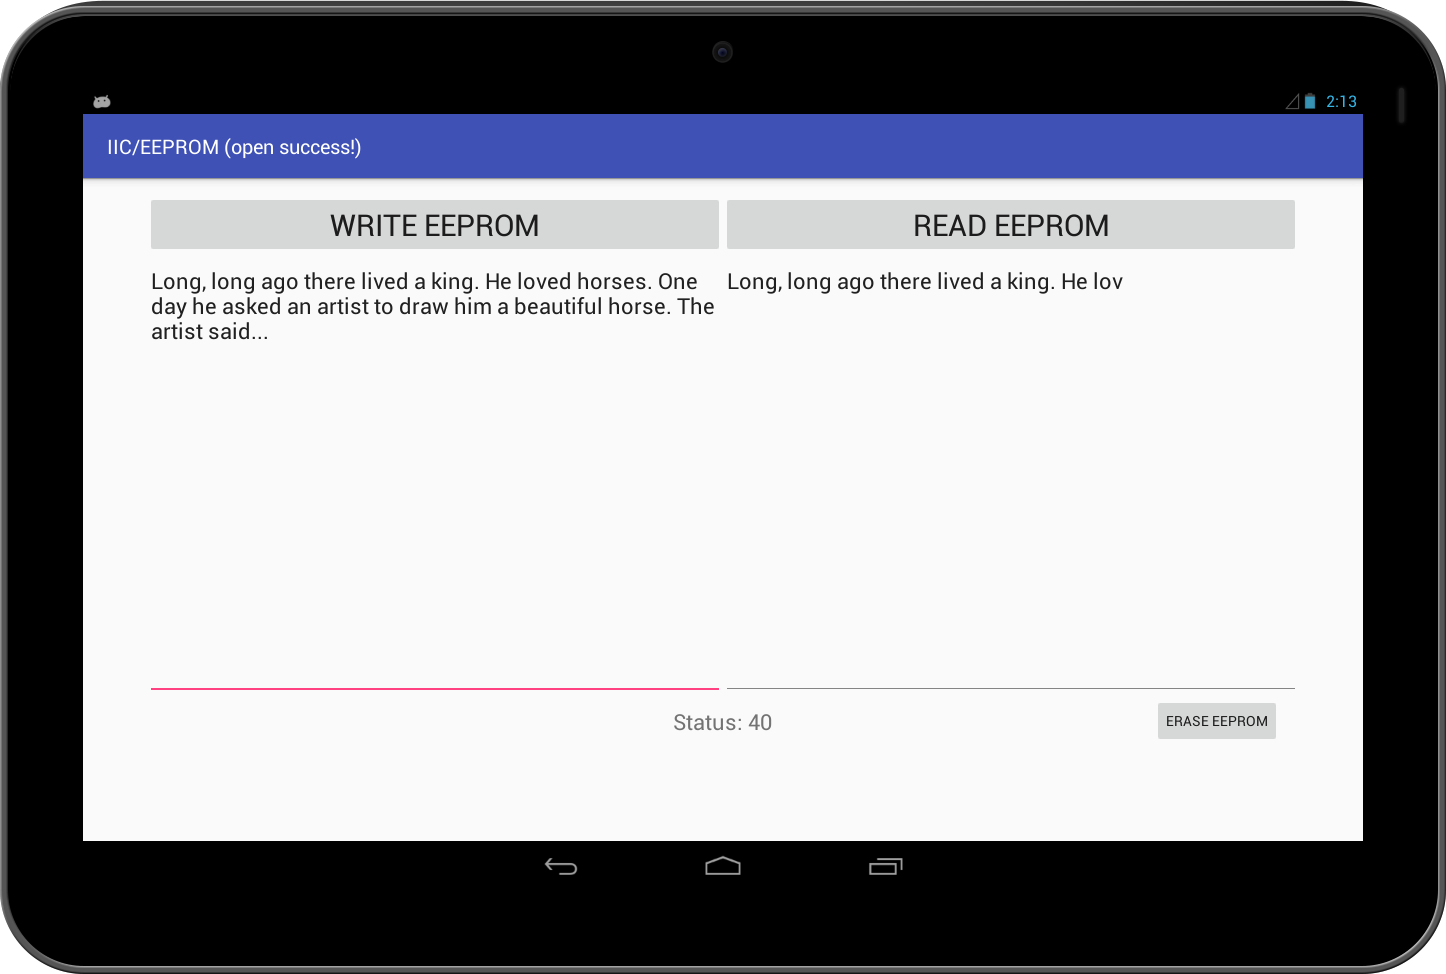
READ EEPROM按钮读取当前EEPROM中的数据,下方Status会实时显示当前读取到的数据的长度,如图5.3.2所示:

图5.3.2 读取数据
- 点击下方的
ERASE EEPROM会清空EEPROM中的数据。
说明:本示例代码中未对中文字符做处理。